How To Add New Departments

In order to add new Departments you have to have the privileges associated with Admin Users. If you are do not have these privileges tied to your account, please consult your company IT department, or contact the CCOM Support Team: support@ccom.no.
1. Navigating to the Department module.
1. From your Dashboard (default landing page), navigate and click the Admin Settings tab under the 'Other' banner.
2. Click the Department tab under the Tenant Settings header.3. Click the + New Department button.
1.2. User Interface Overview
- Add thumbnails: Here you can upload multiple pictures that can be used in different reports.
- Name: Provide the name of the Department.
- ID: Give an appropriate identification to the department. ID for the department will be used in the following modules: Document, Non-Conformance, Audit.
- Add default thumbnail: Click here to upload a photo of your Department that you want to be visible in the Department Selector. Adding this makes it easier for user to identify the ships when switching between departments. (Useful if your company have multiple ships).
- Department type: Choose from the drop down: Land Based (Company Administration) or Vessel (ship)*.
- Department status: Click to expand a dropdown menu: Choose what status the department has: Active, Paused, or Archived
- Modules: Click which CCOMX Module(s) you want to include for this Department.
- + Add contact person: Click here to add the contact info for person responsible for this department.
*Note: *Based on which Department Type you selected, this expands the information needed for a department to be added to the system successfully. See the chapters 2 and 3 further down in this article on Adding a Land Based department and Adding a Vessel department. This gives step by step instructions on how to set up the two different department types.
1.3. + Add contact person
Adding contact person is common for both department types and can be added beforehand:
- First name: Provide first name of contact person.
- Last name: Provide lastname of contact person.
- Prefix: Provide the land code of your the persons phone number.
- Phone number: Provide the contact persons phone number.
- Email: Provide the contact persons email address.
- Country: Provide the contact person country of residence.
- Cancel: Click to cancel this contact person entry.
- Save: Click to save this contact person entry.
Example:
2. Adding a Land Based Department
- Contact Information: IMO number and Contact Information for this land based Department.
- Delivery Information: Specify delivery address if your company's warehouse address is different from your office address.
- + Add contact person: Click to add contact person for this land based Department.
2.1. Contact Information
- IMO number: IMO number is a unique identifier for ships, shipping companies, and management companies, assigned by the International Maritime Organization.
- Country: Provide the name of the country the department is located.
- Zip: Provide the Zip code the department is located.
- City: Provide the name of the city the department is located.
- Address: Provide the address the department is located.
Example:
2.2. Delivery Information
Specify delivery address if your company's warehouse / delivery address is different from your office address.
- Country: Provide the name of the country the delivery address.
- Zip: Provide the Zip code of the delivery address.
- City: Provide the name of the city the delivery address.
- Address: Provide the address name for delivery.
Example:
2.3. Finding the newly created Land Based Department

The newly added department will now be visible in the Departments list and Department Selector:
- Department Selector
- Department List entries
3. Adding a Vessel Department.
If the department you specify is a vessel / ship, you need to fill inn additional information about the ship. Below is an overview of the different sections needed for a vessel.
1. Vessel information.
2. Specification: Total Engine Power Specification
3. Button row for adding additional Main Engines, Auxiliary Engines, Cargo Hold and Cargo Gear.
4. Contact information: Enter the contact information for this vessels administrative building.
3.1. Vessel Information
- Flag state: The flag state of a merchant vessel refers to the legal authority whose laws govern the registration or licensing of the vessel, establishing it as the vessel's nationality.
- Call sign: A call sign is a specific combination of letters and numbers given to a vessel, such as a sailing yacht, motor yacht, rib, or commercial vessel, upon obtaining its Ship Radio License.
- IMO number: The IMO number is a unique identifier for ships, shipping companies, and management companies, assigned by the International Maritime Organization.
- MMSI number: Maritime Mobile Service Identities (MMSIs) are nine-digit numerical codes utilized in Maritime Digital Selective Calling (DSC), automatic identification systems (AIS), and some other equipment. They serve the purpose of uniquely identifying a ship or a coastal radio station.
- Class company: Select class company from dropdown (if applicable).
- DP class: Dynamic Positioning is a system used on ships to automatically maintain the vessel's position and heading using thrusters and propellers. Choose range from 0 to 3.
- Ice class: Ice class is a designation by a classification society or national authority, indicating the strengthened structure and other features that allow a ship to navigate through sea ice. Choose range 1 through 10.
- Operation area: Provide the operation area of the vessel. Example: Svalbard, Arctic Ocean.
- Home port: Choose the home port of the vessel. Example: Port of Reykjavík.
- Construction Yard: Choose the construction yard that completed the vessel. Example: MEST shipyard, Faroe Islands.
3.2. Total Engine Power Specification
Note: The engine power is the sum of all engines added in the next chapter. Add the total power to a single power type that your company is familiar with. If you have multiple engines with different power types, try converting them to a common type and specify the total engine power.
- Engine power: Provide the total engine power for all main engines measured in a common power type for all engines added. Example: 13449.
- Engine type: Click and choose from the drop down menu:
• Diesel electric powered
• Steam powered
• Nuclear powered
• Gas powered
• Electric powered - Size: Enter the size of the vessel in tonnage. Example: 1800
- Size unit: Specify if the vessel tonnage. Choose between:
• Deadweight Tonnage
• Gross tonnage - Length: Specify the length of the vessel.
- Breadth: Specify the breadth of the vessel.
- Depth: Specify the depth of the vessel.
- Dimensions unit: Specify the metric of the length, breadth and depth. Choose between:
• Meter
• Feet
3.3. Adding Main Engines, Auxiliary Engines, Cargo Hold and Cargo Gear.
Click one of these buttons to add the following:
- + Add engine: Specify the main engines of your vessel.
- + Add auxiliary engines: Specify auxiliary engines to your vessel.
- + Add cargo hold: Specify what cargo hold the vessel is equipped with (Deck area dimensions, dimensions of freezers etc.).
- + Add cargo gear: Specify cardo gear available on the ship (winches, cranes, etc.).
3.3.1. Add Main Engines
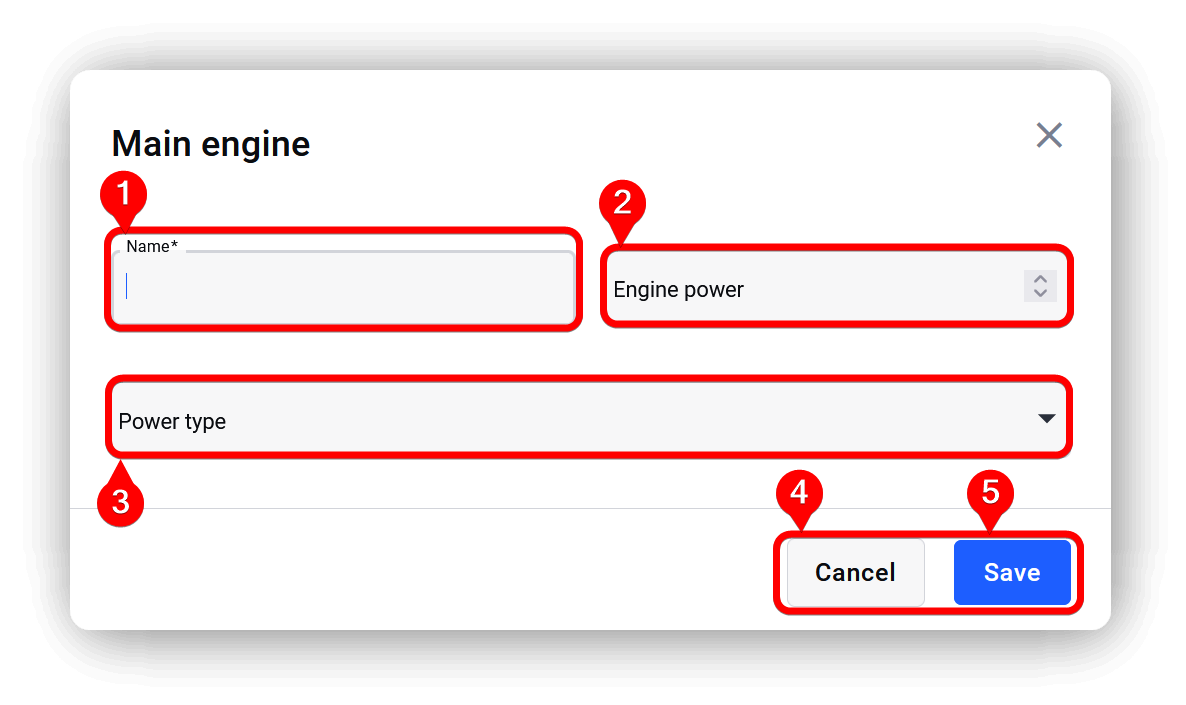
- Name: Specify the model name and model numer of the engine. Example: RPM Bergen B32:40LBA ME1
- Engine power: Specify the engine power of the engine. Example: 3840
- Power type: From the dropdown menu, choose between:
• kW (Kilowatthour)
• kVA (Kilovolt-amperes)
• HP (Horsepower)
• bKW (Brake kilowatts*) - Cancel: Click to cancel the adding of this engine.
- Save: Click to save this engine.
*The term 'bKW' denotes brake kilowatts, representing the power needed to break a pump or motor, bringing it to a complete halt.
Example of a set of main engine:
Note: The total power of the main engines will be the total power (measured in kW in this example) specified in chapter 3.2. Vessel Specification mentioned above.
3.3.2. Add Auxiliary Engine
- Name: Specify the model name and model numer of the Auxiliary Engine. Example: Cat 3516 BTA
- Engine power: Specify the engine power of the Auxiliary Engine. Example: 1902
- Power type: From the dropdown menu, choose between:
• kW (Kilowatthour)
• kVA (Kilovolt-amperes)
• HP (Horsepower)
• bKW (Brake kilowatts*) - Cancel: Click to cancel the adding of this Auxiliary Engine.
- Save: Click to save this Auxiliary Engine.
Example of a set of auxiliary engines:
*The term 'bKW' denotes Brake Kilowatts, representing the power needed to break a pump or motor, bringing it to a complete halt.
3.3.3. Add Cargo Hold
- Name: Provide a name for the cargo hold. Example: Deck Area.
- Volume: Provide Cargo Hold volume tonnage.
- Size Unit: Specify Cargo Hold volume tonnage to be Gross tonnage or Deadweight tonnage.
- Length: Enter length of Cargo Hold.
- Breadth: Enter breadth of Cargo Hold.
- Depth: Enter depth of Cargo Hold.
- Dimensions unit: Specify Cargo Hold measurementunit:
• Meter
• Feet. - Cancel: Cancel this Cargo Hold entry.
- Save: Save this Cargo hold entry.
Example of cargo hold entries:
3.3.4. Add Cargo Gear
- Name: Provide a descriptive name for the vessel Cargo Gear.
- Cancel: Click to cancel this centry.
- Save: Click to save the Cargo Gear entry.
Example of cargo gear entries:
3.4. Add Contact Information
This section is for the contact details for the administrating office of the vessel.
- Country: Provide the country the office is located.
- Zip: Provide the Zip code of the office.
- City: Provide the name of the city of the office.
- Address: Provide the address of the office.
- + Add contact person: Click to add contact person for this vessel.
3.4. Finding the newly added Vessel Department.
The newly added department will now be visible in the Departments list and Department Selector:
- Department Dropdown Selector.
- Department List entries.
Related Articles
How To Add New Shifts
In order to add Shifts in the Crew Management Module you have to have the privileges associated with Admin Users. If you are do not have these privileges tied to your account, please consult your company IT department, or contact the CCOM Support ...How To Add New Users
In order to add new Users in the Crew Management Module you have to have the privileges associated with Admin Users. If you are do not have these privileges tied to your account, please consult your company IT department, or contact the CCOM Support ...How To Add New Department Groups
In order to add new Department Groups in the Departments Module you have to have the privileges associated with Admin Users. If you are do not have these privileges tied to your account, please consult your company IT department, or contact the CCOM ...How To Add Job Positions
Note: In order to add new Job Positions you have to have the privileges associated with Admin Users. If you are do not have these privileges tied to your account, please consult your company IT department, or contact the CCOM Support Team: ...How To Add Privilege Templates
Navigate to the Competence Module Navigate to the Admin Settings in the bottom left corner of the module menu from your CCOM Dashboard. Navigate to the Competence module under the 'Crew Management & Pax' header. Click the Privilege Templates banner ...