How to Print Planned Activity Reports
CCOMX supports generating and exporting .pdf or exel files for print or archival purposes. In this article we'll go through step by step how to print reports from the Planned Activities in the "Shift and Manning"-module.
In step 1 we'll show how to specify report type and file type, and step 2-5 we'll tackle how to generate the four report types supported for print in Planned Activities. Step 6 shows how to print the newly generated reports.
1. Specify Report Type, and File Type.
1.1. Open the Print Activity Popup Window
While the Planned Activities banner is selected, click the Print button below the navigation banners row.
View of Activity Print popup window:
1.2. Specify File Type
Specify what kind of File Type you want the Report to be generated as. You can change filetype as you go.
1.3. Specify Report Type
Specify the Report type you want generate.
1.4 Customizing the Reports
Depending on which Report Type you want to generate, in order for CCOMX to generate the report there are additional information that needs to be filled in.
Please go to the relevant Report Types below and follow the steps.
Please go to the relevant Report Types below and follow the steps.
2. Travel List
The travel list yields the information for each crew member and their recent travels.
2.1. The 'For*' date selector
The 'For'-date is used as point of reference in time for report generation. Normally you would choose todays date unless otherwise instructed from employer. This is for archival and book-keeping purposes.
2.2. Port of Departure and Port of Arrival
These input fields are required and have to be written by the user manually. They are used for point of reference of the voyage the Activity are linked to. It should reflect the actual ports the ship entered and exited.
2.3. Specify Shift
Choose the relevant shift you want to include in the Report.
2.4. Specify Activity
Choose the activity you want reflected in the report.
2.5 Save the Report
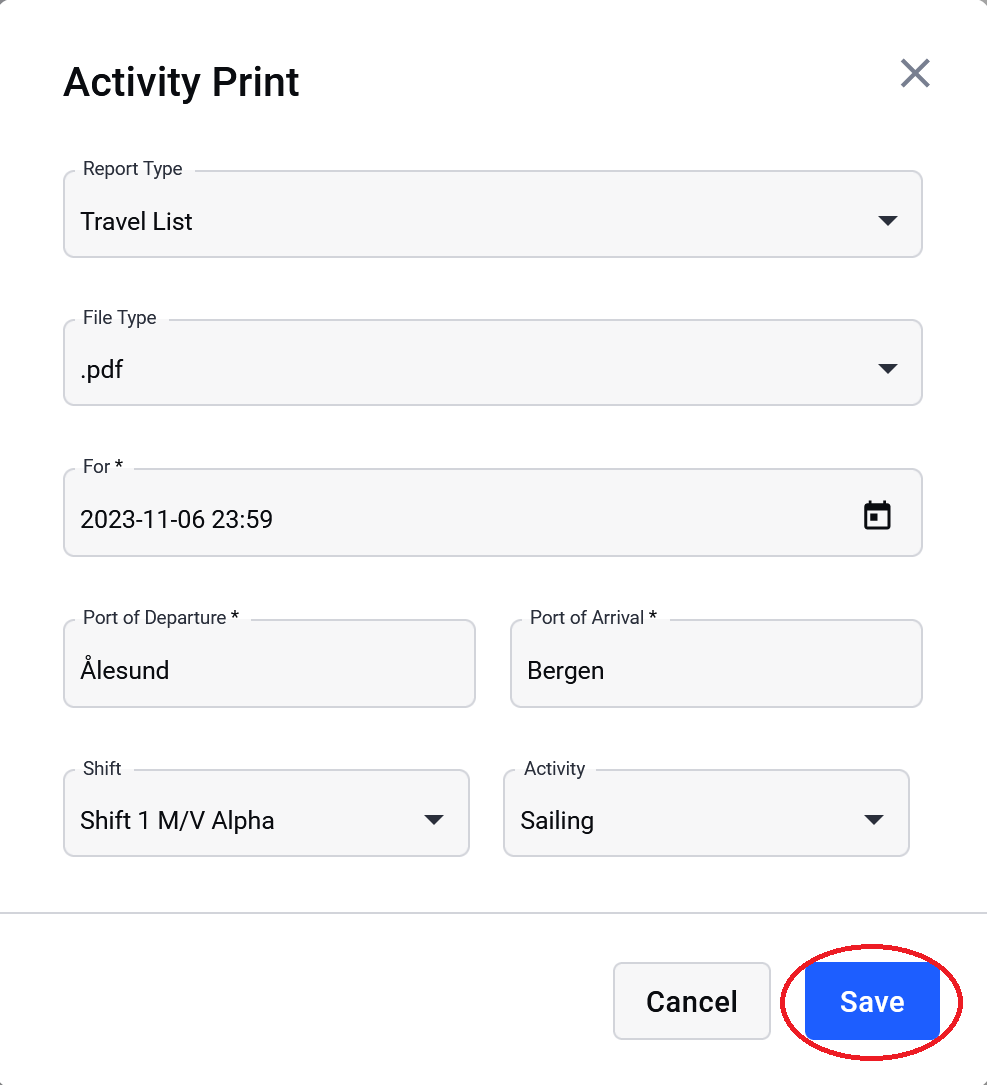
Click "Save" to save the Report. In order to print the saved Report, proceed to step 6 at the bottom of this article for step by step guide of the different print options.
3. IMO Crew List
3.1. The 'For*' date selector
The 'For'-date is used as point of reference in time for report generation. Normally you would choose todays date unless otherwise instructed from employer. This is for archival and book-keeping purposes.
3.2. Port of Departure, Port of Arrival, Voyage Number, Last Port of Call
Port of Departure, Port of Arrival alongside Voyage Number and Last Port of Call are required values, and they have the be entered manually by the user. The skipper should be familiar with these values and are point of reference for the voyaga the report is generated for. The values should reflect the actual ships departure and arrival ports, the last port of call, and the voyage number specified by the ship owner(s).
3.3. Date of Departure, and Date of Arrival
Specify the period you want the Report to reflect. If you are unsure of what dates the ship was sailing, or if you are unsure when a specific fisherman was active, you can consult the main table below the navigation section of the Planned Activities part of the "Shift and Manning"-module:
3.4. Specify Shift
3.5 Specify Activity
3.6 Save the Report
Click "Save" to save the Report. In order to print the saved Report, proceed to step 6 at the bottom of this article for step by step guide of the different print options.
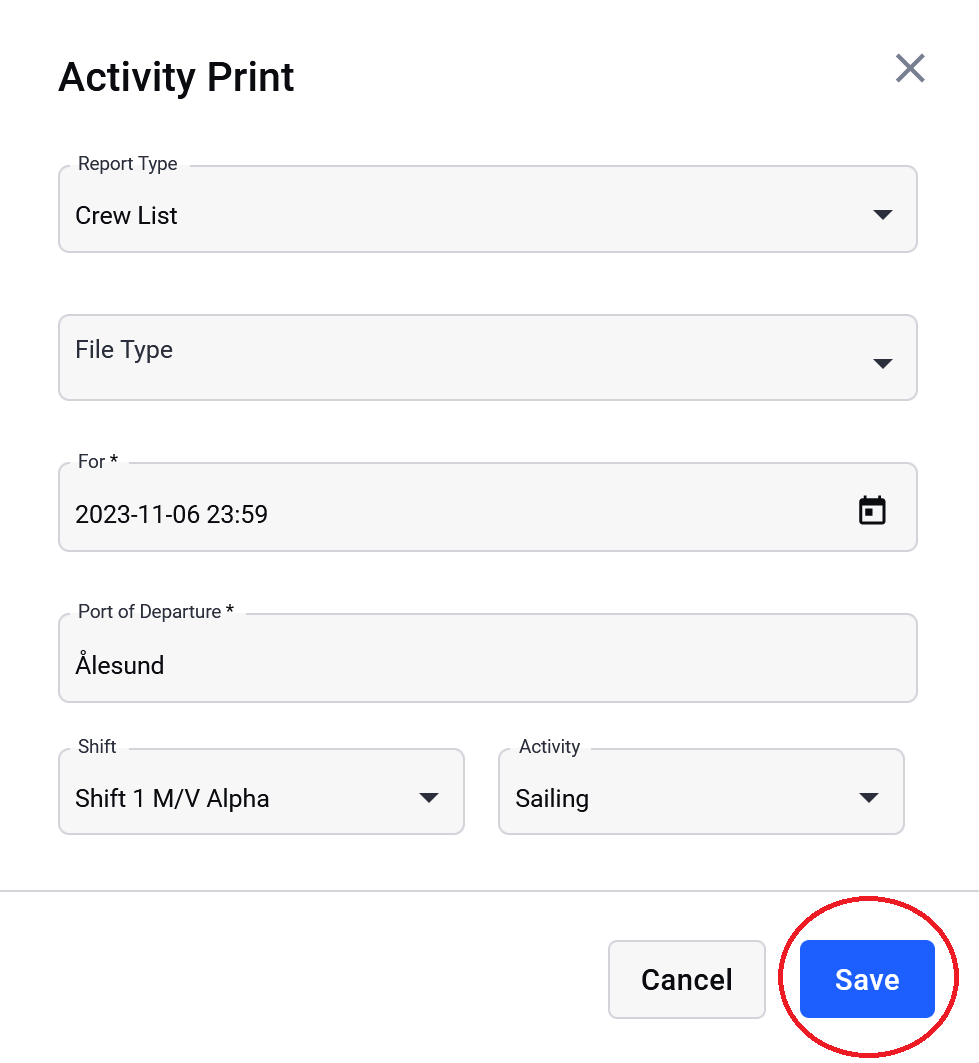
4. Crew List
4.1. The 'For*' date selector
The 'For'-date is used as point of reference in time for report generation. This field is required. Normally you would choose todays date unless otherwise instructed from employer. This is for archival and book-keeping purposes.
4.2. Port of Departure
This input fields are required and have to be written by the user manually. They are used for point of reference of the voyage the Activity are linked to. It should reflect the actual port the ship most recently departed.
4.3. Specify Shift
Choose the relevant shift you want to include in the Report.
4.4. Specify Activity
Choose the activity you want reflected in the report.
4.5 Save the Report
Click "Save" to save the Report. In order to print the saved Report, proceed to step 6 at the bottom of this article for step by step guide of the different print options.
5. Total Sailing Time
5.1. From date, to date
Here you need to specify the period you want the Report to reflect. If you are unsure of what dates the ship was sailing, or if you are unsure when a specific fisherman was active, you can consult the main table below the navigation section of the Planned Activities part of the "Shift and Manning"-module:
5.2. Include deactivated users
The "Include deactivaded uses" checkbox is checked by default. If you do not want to include deactivaded users, uncheck this checkbox. This feature is relevant when dating documents back in time.
Selct the Crew Memebers you want to include data about in your Report.
Check the "Select all users" checkbox if you want to include all users.
5.3. Save the Report
In order to print the saved report, proceed to step 6 at the bottom of this article for step by step guide of the different print options.
6. Printing the Reports
In order to print the Reports you first have to generate them as shown in the previous steps. The steps for printing the newly generated files are the same for each Report type therefore the steps for printing earch Report is collected here. The most common way to print is directly from the browser. The Report should automatically open as a new tab and be readable in the browser when the file is saved i.e generated. If the report is not automatically opened in a new tab check your Download Tab in your browser or Downloads folder on your computer.
6.1 Printing from your Web Browser
If the raport opens in a new tab in the browser, press the Print icon in the top right corner.
6.1.1 Specify Printer Destination
This may vary from browser to browser and depending on your printer configuration but select the printer you want to print from. (Some browser automatically specifies the printer as "Save as PDF" which only downloads the file — check the name of your printer if you are unsure what printer to select.)
6.2. Printing .pdf files with Adobe Acrobate
6.2.1. Open the Report in Adobe Acrobat
Find the file in your Downloads tab, or optionally find it in your Downloads folder, and open it by double clicking the file (Examples shown are from Firefox and Windows 11 File Explorer).
When the document is opened. Press the "Menu" button in the top left corner of the window and click "Print...". Optionally press "Ctrl + P" and proceed to next step.
6.2.1. Adobe Acrobat Print Options:
Select desired copies and layout then click "print".
6.3. Printing Microsoft Excel Spreadsheets
6.3.1. Open the file in Excel
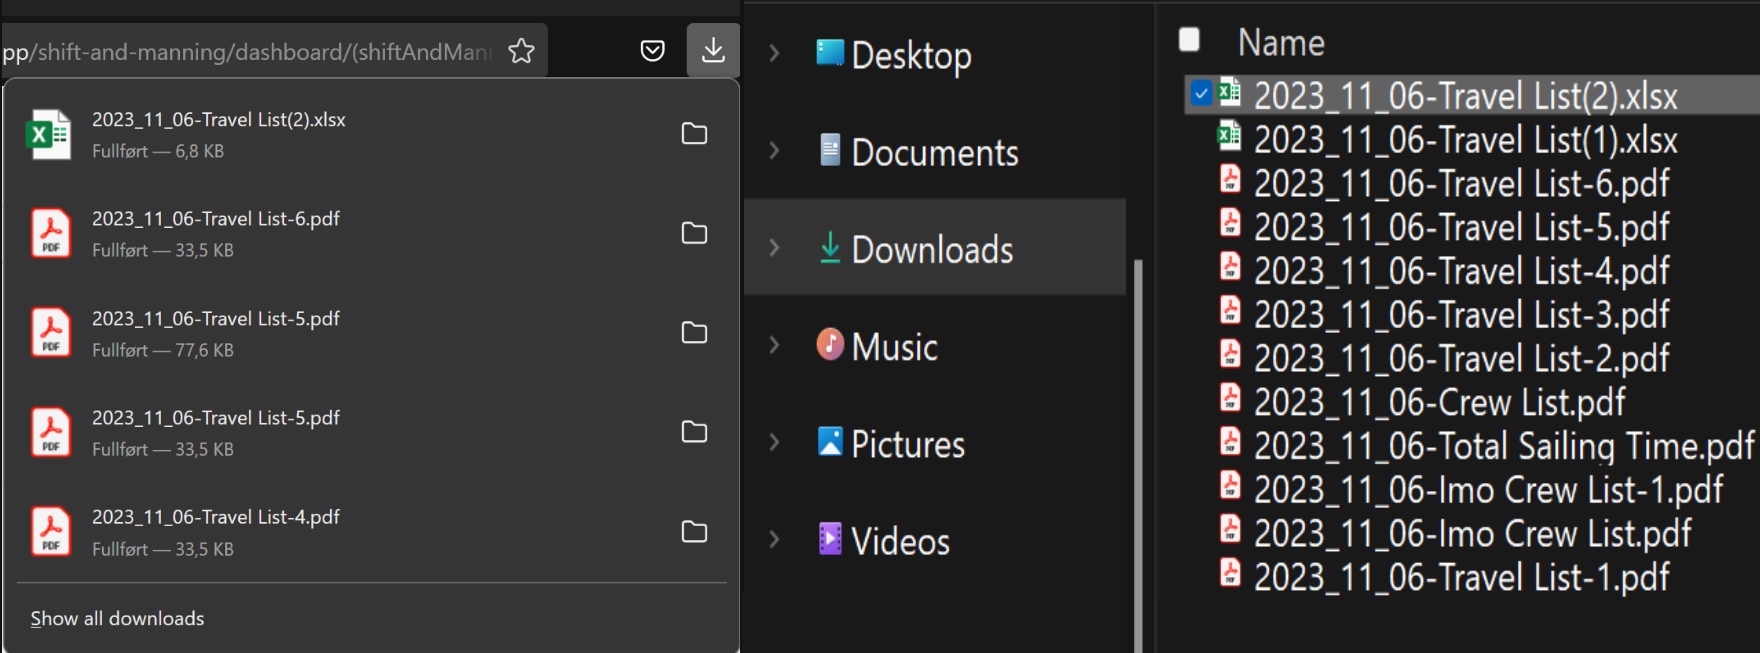
Open the file either from the Downlaod tab in your browser (shown to the left on a Mozilla Browser) or by navigating to your Downlaods folder on your operating system and by double clicking the Report you want to open.
6.3.2. Printing the Excel file
Once the file is open; click the "File"-banner at the top navigation bar. Optionally press "Ctrl + P" and proceed to step 6.3.3 Microsoft Excel Print options.
Then click "Print" on the dropdown menu that appears to the left.
6.3.3. Microsoft Excel Print Options
Select desired copies, layout, and printer—then click Print to print the document.
Related Articles
Plan Activity
Add new Planned Activity Fields needed to continue planning the activity for selected personnel Activity Selects one of the activities available*. Shift Selects one of the shifts available*. From Selects the date when the activity will start To ...Planned Activities
Table overview The "Planned Activity" tab displays a list of users who either currently have scheduled activities or have had them in the past. As the number of planned activities increases, the list will grow accordingly. Table overview for the ...Competence matrix for Planned Activities
IMPORTANT NOTICE: To ensure the Competence Matrix functions correctly, it is essential to configure the competence requirements accurately. If the requirements are not set up correctly, you will receive the following message: Competence matrix for ...Trips overview
If trip based crew management is configured for the selected department, you will now see a list of already-created trips when you go to the "Shift And Manning" area. Important differences from activity based crew management and previous versions: ...Confidential and Anonymous Reports
Confidential and Anonymous Reports Confidential and Anonymous report times has gotten a new home. These options can now be enabled or disabled on each report type These options does not automatically enable the function for a report, it only controls ...